background

Showing posts with label Cards. Show all posts

Thursday, June 21, 2012

More Interactive Cards

So, I've been on this interactive card kick this summer.  My customers have really enjoyed learning new cards that slide open, pop up, or do something fun.  The first workshop I did back in May was a little more difficult. . .the second round will actually be easier.  Here's what I've come up with for my second round workshop (June 25th & 28th):
Okay--so this was my favorite card of the bunch.  I learned how to make this card years ago at a team meeting, and what I like about it is that, when it's folded flat, it fits in a regular envelope.  I started with a piece of cardstock 10 1/2 x 5 inches.  I scored the cardstock at 2 1/4, 4 1/2, 6 1/4, 8 and 9 1/4 inches.  Starting with the 2 1/4 line, make it a mountain fold, the next one a valley, the next one a mountain, etc., to get the zig-zag structure of the card.  After that, it's just a matter of embellishing each layer like you want it.  Note that, on the second and third panels, I added another piece of cardstock to get the height I wanted for that layer (just make sure each layer is a little taller than the one in front of it).
I used the stamp set "Look Who's. . ." (D1502) for this card, and it was perfect for it!  I love the "party" banner running across the second layer (you can cut the banner pennants on your Art Philosophy cartridge and stamp them with the matching stamps).  You also get a set of numbers in this stamp set, so you can personalize the card with the recipient's age.   To order this stamp set, visit my website, http://christina.myctmh.com    Don't forget that stamp sets are BUY TWO, GET ONE FREE in the month of June!!  Also, FYI, I used paper from the Superhero paper packet.


This card is a "spinner card."  When you tilt it to the side, the girl will turn somersaults.  She doesn't always end up on her feet, but it's still cute!!  The stamp set I used is "Child's Play" (D1515).  There's also a little boy kicking a football in this stamp set, and he works on this spinner, too.  Essentially, to make a spinner card, you decide where you want the slot for your focal point to spin.  In this case, I think I drew a line 1 1/4 inch from the bottom across the back of the card front.  Then, I punched a circle with my 1/2" circle punch centered on that line (I just punched it in as far as the punch would go).  Then, I used my paper trimmer to cut a track from one circle to the other (the track will be somewhere between 1/4 and 1/2 inch wide).  To make the spinner mechanism, I took two pennies and stuck them together with a piece of foam mounting tape.  If you have circular 3D foam dots, they work great.  If you're using a square piece, I recommend rounding the corners a bit.  Then, you put your stuck-together pennies into the slot with one in front of the slot and one in the back.  It should roll back and forth down the slot.  Then, add your image to the front of the penny.  Mount your card front onto the card with foam tape.


 I'm not sure what you call this next card--maybe an Accordian Card of sorts.  One of my customers received a card like this from a friend, so I had to borrow it and figured out how to make it.  It starts with a 4 x 12 strip of cardstock.  I scored it at 2, 4, 8 and 10 inches.  I also made a little mark at the top and bottom at 6 inches, so I'd know where the middle point is.  Then, I use a ruler and a scoring tool to make the diagonal lines.  I've added a diagram. . .my apologies that it's sideways.  Each time I try to put it on my blog, it turns it sideways!!!  By the way, I used paper from the Florentine paper packet and the stamp is B1400, Beautiful Friendship.


So, the last card idea I got from Rhonda Leeper, one of my team members.  This card is made up of three concentric circles, attached by brads.  So, when you pull on the ribbon tab (which is only attached to the smallest top circle), the card comes open to reveal the three stacked circles.  Hey, wouldn't this be cute in winter with snowmen?!  I used the Dotty for You paper pack and the Hooray Bouquet stamp set (one of my FAVORITES).  The colors I used were Buttercup, Lagoon, Sunset, Smoothie and Sweet Leaf.


Friday, October 28, 2011

October Stamp of the Month Creations

 These are cards and boxes I designed for my October Stamp of the Month class.  Although it's too late to sign up for the class, it's NOT too late to order the October Stamp of the Month, Holiday Magic.  You can purchase it for $17.95 or get it for $5 with a $50 purchase!  You can order online or contact me by Oct. 31st.

Saturday, October 22, 2011

Cards from my Christmas Card Marathon (Oct. 24 & 25th)

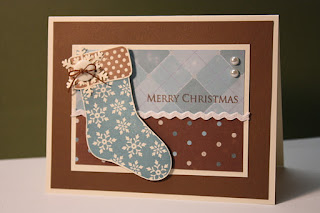
 I've been a Christmas card FACTORY lately getting ready for my fall classes!  These five cards are the ones we'll be making for my Christmas Card Marathon.  The first two designs (the blue & brown stocking card and the striped/snowflake card) were inspired by Vicki Wizniuk (visit her blog at www.wizardshangout.blogspot.com) and the three remaining cards are my designs.


Tuesday, October 4, 2011

Why I love the Art Philosophy Cricut Cartridge!

These cards are exactly why I love the new Art Philosophy Cartridge SO much!  How fun it is to play around with all of the cute ornaments, tags and Christmas shapes on this cartridge!  I used the Elemental paper packet for both of these cards.

If you haven't yet purchased the Close to My Heart Cricut Collection, what are you waiting for??

More Inspiration from my fabulous team!


A card by Sandee DePriest inspired me to make this stand-up card featuring Wonderland paper.  Sandee is a wonderful card maker, and I'm so happy that she shares her great ideas with our team!  If you want to see her original version (with scalloped edges), scroll back a few posts until you find the swap cards from my last team meeting.  For this card, I cut the base cardstock 8 1/2 x 5 1/2.  Then, I scored it at 1 1/2, 2 1/2, 5, and 6 1/4.  When the card is folded flat, it will fit in a standard invitation envelope, and when it's stretched out, it will stand up nicely.  We'll also be making this card in my Christmas Card Sampler class.

Card Ideas from one of my favorite card makers!

 I don't know about you all, but I love to browse through artwork on blogs, bulletin boards and magazines looking for great designs that just make me SMILE!  One of my favorite bloggers is Vicki Wizniuk from British Columbia.  If you'd like to view her blog click HERE.  You won't be disappointed because her artwork is incredible!  Both of these cards are inspired by Vicki's card designs. . .one's a pretty close copy and the other's a little different.  If you'd like to make these two cards, come join me at my Christmas Card Sampler Class!

Money Holder Card (from Christmas Card Sampler Class)


Rita Hartsock, one of my awesome team members, sent the autumn version of this card/money holder to me, and I loved it so much that I had to make a Christmas version.  Rita said she used a money envelope from her bank as the pattern/inspiration, and I thought it was pretty clever!   To make this card, I started off with a piece of cardstock that was 8 1/2 square.  I scored it at 2 1/2 inches and 6 inches to make the tri-fold card base.  Then, I turned it the other way and scored it one inch from the edge down each side of the card.  This formed my flaps.  I completely cut off the flaps from the top and bottom sections of the card and then cut the remaining middle flaps at a curve.  If you're coming to the Christmas Card Sampler class on Oct. 6th or 11th, you'll be learning how to make this card.  Thanks, Rita!

Tuesday, March 8, 2011

Clear Cards from my Clear Card Fun Class!!

These are the cards we made at my Clear Card Fun class this week.  I had a great group of ladies who worked hard to make these six different cards--all featuring stamps and papers from our new Spring/Summer catalog. 


Friday, October 29, 2010

CARDS FROM MY CHRISTMAS CARD SAMPLER


These are some of the cards we made at my Christmas Card Sampler Class last night.  I'll be having another Christmas card class, the Christmas Card Marathon, coming up Nov. 8th or 9th (same class both nights).  At the marathon class, we'll be making 20 cards in one night (four each of five designs).  If you'd like to come, be sure to contact me!  Cost is $8 for materials plus a $10 minimum order.

Tuesday, October 5, 2010

THESE CARDS ARE CLEARLY THE MOST FUN!


 Today I've been designing clear cards for my Thursday night clear card class.  If you haven't yet tried these clear cards from Close to My Heart, you need to give it a go!  Clear cards require a little more thought to put together, but they're not difficult, and there's something really cool about giving someone a clear card.