I have some great specials that I will be running all through the week of Thanksgiving. To take advantage of any of the specials, just call me or e-mail me anytime next week. You can "stack" multiple deals in one order. . .and, if your purchased items add up to $50, you'll get the November stamp of the month, Illuminate (so cute--scroll down to see it) for FREE!Check out my holiday deals (you can take advantage of multiple deals on the same order):
- Order a My Crush Book and get a My Crush Assortment FREE ($4.95 value)--these books are similar to the "Smash" books you might find in craft stores--they're designed for easy, informal scrapbooking, and they're also perfect for teens and kids.
- Order a Close to My Heart Cricut Collection (Art Philosophy, Artiste, or Artbooking) and choose TWO FREE PAPER PACKETS ($19.90 value)
- Order two "Cards & Envelopes" sets and get a free ink pad in the color of your choice ($5.25 value)--choose from Circle Spin Cards, White or Colonial White Value Pack Cards, Col. White Die-Cut Cards & Envelopes or the White Daisy Die-Cut Cards and Envelopes, p. 129 of catalog
- Buy three Glitz Glitter Gels and get one FREE ($2.75 value)
- Buy FOUR ink pads, get a FIFTH one FREE ($5.25 value)
- Buy $30 worth of stamp sets, get any clear My Acrylix Block ($7.50 or less) for FREE
- If your order totals $50 or more, I will give you the November Stamp of the Month FREE
- Buy one of our AWESOME Faux Leather My Legacy Albums, and I'll add an extra 10-pack of page protectors FREE ($5.95 value)
- Buy the value pack (50 pages) of our Memory Protectors and get a free package of Spine Expanders ($2.95) to add stability to your albums
Monday, November 25, 2013
Thanksgiving Specials!
Cards for my Christmas Card Sampler Class, Monday, December 2nd
I didn't get a chance to use every Christmas stamp set that I wanted to use at my Christmas Card Marathon class, so I thought I'd add the Christmas Card Sampler Class. These cards have a bit more layering, coloring, etc.--not good candidates for our speedy card marathon class--but they're perfect for this class. Here's what I've come up with so far. . .


This card is a Center Step Card--one of those fun, 3D cards that we all love. You can find the instructions for these cards on www.splitcoaststampers.com (look under Tutorials). I saw a similar card made by Cathy Derouche and knew I had to make one, too (thanks, Cathy, for the inspiration)! The stamp set is C1506 Flakey Friends.

I just adore our polar bear stamp set (C1557 Polar Bear Holiday). . .can't get enough of these cute little fellas! My inspiration for this card came from one of the display boards at Convention this year (not sure who the artist was--perhaps Michelle Snyder?). I took a picture of the card, and I've been waiting to make a similar card ever since. One of the quickest ways to get some background snow on your card is to rip white cardstock and then add some Prisma Glitter (on top of Bonding Memories glue) to the edge where you ripped it.

The stamp that I used for this card (B1424 Classy Doily) is the coolest thing. The doily is one stamp image, but you can stamp the image multiple times on different papers, cut out a specific section and then layer them back together for a really dramatic look. It sounds time-consuming, but I promise it's not too bad!
Thursday, November 21, 2013
Decisions, Decisions
I designed two different Kraft Containers for my Great Gifty Ideas Workshop, but I can't decide which one we should do. So, my answer to that is to let you pick. So, if you're attending the workshop tonight, let me know which one you'd like to make. The top one features the Sparkle and Shine papers and lots of sparkly red shimmer trimmer. The second one has a lot of beautiful detail using the Classy Doily (B1424) stamp and the Frosted Paper Packet. Both of them have some sparkle, which doesn't show well in my photos.


Monday, November 18, 2013
Tuesday, November 12, 2013
Projects for Great Gifty Ideas Workshop
Every November, I teach a "Great Gifty Ideas" workshop designed to give you quick, affordable gift ideas for the Christmas season. The workshop is coming up Thursday, November 21st, at 6 p.m. Cost is only $15 (my bargain class for the fall), and you'll go home with several fun projects. I've got three slots left in this class, and I'll add a second night if it fills up. Here's what I have planned. . .


 |
| This treat box is cut on the Artiste cartridge. I cut a window out of it so that you could dispense the candy from the bottom. You could also put tea bags in this box. If you'd rather put bagged candy or a small gift item in the box, don't cut out the window. |

I got the idea for these gift card holders from Consultant Hillary Harris--so glad she shared this! It's an adorable way to give someone a gift card, and they're so simple that you can make a batch of them in a short amount of time.

Here's a peek at the inside--they're just the right size for a gift card.

I've been wanting to do these Kraft Containers in a workshop for so long--now's the time!

Here's another SUPER EASY idea I found online--it's a gift tag with a pouch in it--just the right size for a piece of candy.

These pouches are featured in our Holidays from the Heart Gift Guide, and I thought it would be fun for us to make one. You can order the pouches in packs of six for $8.95.
Monday, November 11, 2013
November Club Projects
I've got some beautiful Christmas projects lined up for our November club on Monday, Nov. 18th. If you'd like to come join us, let me know ASAP. Cost to attend is a $20 minimum order.
Scrapbookers will be creating this Frosted Layout featuring glittery snowflakes and Sparkle Flourishes. This layout is from our Frosted Workshop on the Go Scrapbooking Kit, so if you can't come to club but still want to create this beautiful layout, you can just order the kit and do it yourself! Note: if you'd like to add the Sparkle Flourishes, you'll need to order them for yourself. We'll also be using them on our Sparkle & Shine Christmas layout for December club next month--so one set should do you or both projects.


The last card idea came from the Holidays from the Heart Guide--featuring Sparkle & Shine Paper and those awesome new Sparkle Holiday Shapes (can't get enough of these)!
Scrapbookers will be creating this Frosted Layout featuring glittery snowflakes and Sparkle Flourishes. This layout is from our Frosted Workshop on the Go Scrapbooking Kit, so if you can't come to club but still want to create this beautiful layout, you can just order the kit and do it yourself! Note: if you'd like to add the Sparkle Flourishes, you'll need to order them for yourself. We'll also be using them on our Sparkle & Shine Christmas layout for December club next month--so one set should do you or both projects.

Card makers will be making some gorgeous Christmas cards. Here are three of the cards (I'm still deciding on a fourth). The top card is my version of a card I saw at Convention this year (shown by Sheri Rottler, I believe). The middle card is my version of one of the adorable cards shown in our Autumn/Winter Idea Book. The white overlay on the front of the card is cut using the new Artbooking Cricut Cartridge (LOVE those overlays).


The penguin comes from one of our Exclusive Hostess Stamp Sets. . .the only way to get them is with your Hostess Rewards. Did you know that you can collect $25 in Hostess Rewards with one $150 order??

The last card idea came from the Holidays from the Heart Guide--featuring Sparkle & Shine Paper and those awesome new Sparkle Holiday Shapes (can't get enough of these)!
November Stamp of the Month: Illuminate
The lanterns in our November Stamp of the Month set, Illuminate, are SO pretty! Be sure you order this stamp set before the month is over. You can get it for only $5 with a $50 purchase, or purchase it for the retail price of $17.95. Visit my website, http://christina.ctmh.com, or contact me to order.


I'm so excited to give you a sneak peek at a new program that we will be unveiling with our Spring/Summer Catalog! We're always looking for ways to make scrapbooking more "do-able" for everyone, and I think this program fits the bill.
Scrapbook dozens of photos in no time at all with the new Picture My Life™ scrapbooking program, designed with the signature Close To My Heart design flair. Select from eight charming themes, each featuring 122 double-sided cards plus 10 unique Memory Protectors™ to capture life as it happens. Whether you choose to embrace a single theme in your album or mix and match for a truly unique look, you’ll love the ease, affordability, and beauty of the Picture My Life programs, each based on a popular My Reflections™ paper packet. Even better, you can earn yours free when you sign up as a Close To My Heart Consultant between November 1–December 15, 2013** (a $24.95 value!)
If you sign up as a new Consultant between now and Dec. 15th and have $300 in sales by the end of March (EASY!), you can earn one of these awesome programs for FREE! Our basic new Consultant kit is only $49, so anyone can afford to get started with Close to My Heart. I'd love to welcome you to my team!
 |
| Avonlea |
 |
| Babycakes |
 |
| Chantilly |
 |
| Later Sk8er |
 |
| Laughing Lola |
 |
| Surf's Up |
Friday, November 8, 2013
Paper Christmas Trees
I don't think I've ever seen a project that has caused so many people to ask "how do you make that?" than the Christmas trees on the front of our Holidays from the Heart Gift Guide. So, I decided I had to try one for myself, and they're really not hard. It's not rocket science, nor do you need precise, step-by-step instructions to get this one figured out. And, I've also discovered that there's really more than one way to make one of these trees. Let me give you some general tips for how I made mine, then I'll give you some other options. First of all, to make these trees, you need the Artiste Cricut cartridge which makes the rosettes (or yo yo's, as I like to call them) that will make up the layers of this tree.

Here's a photo of the page I used in the Artiste book. You can choose any rosette you want--it's up to you to decide what kind of edge you want on your layers.

As for size, the largest piece you can cut on a regular 12" mat is about 2 1/2 inches, so that's where I started. One piece, cut at 2 1/2 inches, will look like this (it's about 11 inches long):

Once your piece is cut, you'll accordion fold it using the slits as your guide. If you're using cardstock, you may have to using a scoring tool to score lines across those slits, but with B&T paper, which is a little lighter, you can probably just fold it back and forth by hand.

For the bottom layer, I cut THREE of these 2 1/2 inch strips. I accordion-folded all of the strips and then attached them end-to-end to make a circle. Note, your circles will keeping "boing"ing up like a lampshade--they won't stay put until you glue them down. I cut a circle of cardstock (about three inches for the bottom layer) and hot-glued the rosette to it.
For the next layer, I again cut three 2 1/2 inch pieces, but I scrunched them together a little tighter than the first rosette so that the circle was a bit smaller. Then, for the third layer, I cut only two pieces to make that rosette, which made it a little smaller. For the fourth layer, I dropped the size down to 2 1/4. I think I used three for layer four, then only two at 2 1/4" for layer five. For layer six, I dropped the size down to 2".
So basically, you keep dropping the size down by 1/4" increments.
You may have noticed that the layers on my tree get a little shallower as I go up. If you want to keep every layer of your tree the exact same depth (which is more like what is shown on the Holidays from the Heart Gift Guide shown below) I'd probably keep cutting my rosette pieces somewhere between 2 and 2 1/2", and then, as I worked my way up, I'd just trim down the height of the piece on the straight side (you'll have to do this while the rosette is still flat, before you glue them together). This will allow you to make your circles a little bit tighter each time.

The snowflakes on the tree were also cut with the Artiste cartridge using our silver Glitter Paper. Our Glitter Paper cuts beautifully on the Cricut, so give it a whirl.
You can find all of the supplies for this project (Artiste Cartridge, Sparkle & Shine paper, and Glitter paper) on my website at http://christina.ctmh.com
Thursday, November 7, 2013
Countdown to Christmas Frame
This is my attempt at one of the Countdown to Christmas frames shown in our Holiday from the Heart Gift Guide. I cut the boxes from the Artiste Cricut Cartridge (last image in the book) at 1 1/2 inches. The photo is a little washed out, but I just love all the little number images that I stamped and cut out to put on the from of the boxes. They came from the Magical Days stamp set (D1552), which is also in the Holiday Gift Guide. In fact, with a $100 order, you can get the stamp set free!! You can order the awesome Designed Decor Black Frame and everything you need to make this project (including the miniature clothes pins) from my website at http://christina.ctmh.com
 |
 |
| Here's a more detailed photo so you can see the number stamps on the boxes--each number is unique! |
Wednesday, November 6, 2013
Cards from my Christmas Card Marathon Workshop
Thought I'd share with you the cards that we made at my Christmas Card Marathon workshop this month. You can order the stamp sets and products to create all of these cards on my website, christina.ctmh.com
 |
| "Merry" is cut from the Artbooking Cricut Cartridge, and the paper is from the Sparkle & Shine paper pack. |
 |
| The patterned stripes on the front of the card are created with our new Sparkle & Shine Washi Tape (LOVE it)!! This tape is SO easy to work with. |
 |
| This ornament card is cut from the Art Philosophy Cricut Cartridge. Love our shiny Red Shimmer Trim to give the card a little sparkle! |
 |
| I used the Frosted papers and the trees from C1559 Always Grateful Stamp set. The "Peace and Joy" stamp comes from the Frosted Cardmaking Kit stamp set. I've got our Green Glitz Glitter Gel on the tree--it doesn't show that well in the photo, but this stuff really sparkles. . .love it on the trees! |
 |
| This card also used our Frosted Paper Pack, but I combined it with Cocoa cardstock. I used D1483 Glory to God stamp set. |
Sunday, October 20, 2013
Sparkle & Shine Hinged Display Tray
After making the large Christmas Display Trays last year (inspired by Lisa Stenz), I knew it would be a breeze to whip out one of the smaller Hinged Display Trays with our new Sparkle & Shine products. With all these cute accessories, it only took about an hour to put this together!

To make this project, you'll need:
Z1838 Hinged Display Tray ($18.95)
X7176B Sparkle & Shine Paper Packet, $9.95
X7176C Sparkle & Shine Complements Dimensional Elements
Z1860 Sparkle & Shine Assortment
Z1861 Ruby Mini-Medley Accents
Z1846 Ruby Chevron Ribbon
Z1752 Clear Sparkles
Z1848 Red Shimmer Trim (I used just a small amount to put bows on my ornaments)
I cut a couple of small things with my Cricut--the red snowflake and the leaves to go with the poinsettias
You can order all of these products on my website at christina.ctmh.com
Thursday, October 17, 2013
Halloween Fun with Cricut Artbooking!
I've had such a blast playing with the Halloween images on the Cricut Artbooking Cartridge. It's SO EASY to put together a quick layout using this cartridge! It's even more fun to cut the images in our awesome Glitter Paper! The background paper for these layouts and the cards come from the Laughing Lola paper pack (Thanks, Michelle Snyder, for inspiring me to use these colors). I cut images out of black, Honey, Pear, Lagoon and Sunset. If you don't yet have the Artbooking cartridge, this is one you NEED in your collection! You can order the Artbooking Collection today on my website, christina.ctmh.com. If you have a $100 order, you get to pick a FREE Christmas item from the Holidays from the Heart Gift Guide!


Monday, October 14, 2013
October Stamp of the Month--Scandinavian Wishes

 |
| Here's a simple tag that we made for our "Make N' Take" at my open house last week. The images in this stamp set lend themselves to clean, simple cards. |
 |
| I got this card idea from Karen Pedersen--it's just a simple card, but I love how it uses the border stamp vertically on the bottom of the card! Colors are Juniper, Slate and Ruby. |
Fall Luminaries
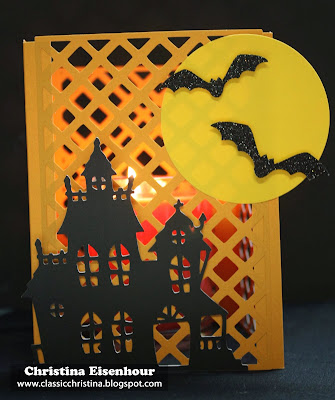
I saw some luminaries in our Autumn/Winter Idea Book, and I just had to make some for myself! These are so fun, and they look so pretty around a glowing candle. I recommend that you use a candle in a jar so there's no danger of your paper luminaries catching on fire! Both of these luminaries were made with images from the Artbooking Cricut Cartridge. I used the lattice overlay on the "e" key. I cut mine around 6" to 6 1/2". You could make them larger, but this seemed to be a good size to go around those medium size jar candles. For one luminary, you'll need to cut FOUR overlays of the same size. Then, you'll need four strips of coordinating paper about 1" wide to glue in the corners to hold the side panels together. You can put any kind of embellishments on the outside of the overlay. On the Halloween luminary, I cut the haunted house and bats from the Artbooking cartridge, p. 71. On the autumn overlay, I cut the leaves from the Artbooking cartridge, and I think I got the "Happy Harvest" shape off the Art Philosophy cartridge. The words are from the Huntington paper--it's the "zip strip" off one of the papers in the pack. The paper for the luminary is from the Sarita paper pack.


Monday, October 7, 2013
Monday, September 30, 2013
October Club Projects
Thought I'd share with you some of the projects we'll be making in my October clubs. If you'd like to join us, we meet on Monday, October 21st, 10 a.m. or 6: 30 p.m. You can choose to make the two-page layout or cards (and burlap bag). Cost to attend club is a $20 minimum order.


Tuesday, September 24, 2013
Thursday, September 19, 2013
Wednesday, September 11, 2013
Thought I'd show you a couple more cards I made with the "You Are My Happy" stamp set. Remember that this TRIPLE stamp set is available only in September and it's only $10 with a $50 purchase (see the stamp set images below). What I think I like about this set so much is that you can stamp most of your cards with just a black stamp pad. On the top card (which will be one of the cards for our 20 Card Marathon class later this month), I cut the flowers using the Art Philosophy Cricut cartridge and stamped them in black. You could cut the flowers out of any color you like because black and white goes with everything! For the bottom card, I stamped all of the birds in black, but I also stamped one on a scrap piece of Honey cardstock, cut it out and mounted it on the one that I stamped on the white background.


Subscribe to:
Posts (Atom)