background

Wednesday, December 19, 2012

So incredibly CUTE. . .and a great deal!!

You're going to love our special this month!  For only $10, you can purchase this kit, which includes an exclusive stamp set, these adorable pre-cut cardstock boxes, the clear treat tubes and additional cardstock (including our new silver glitter paper).  Click on the video link below to see what you can make with this wonderful kit. 

http://youtu.be/sH8QXSbKDBQ


You can order this fantastic kit--including this adorable stamp set--now through the end of January.  It's only $10 with a $35 purchase!!!  You can contact me or order it directly through my website, http://christina.ctmh.com (click on SHOP).


It's beginning to look a lot like Christmas!

Every year, Jeanette Lynton (founder and CEO of Close to My Heart) sends out a beautiful card and gift to her Directors!!  I just had to share this card with you.  Wish I had seen this a couple weeks ago--I definitely would have added it to one of my workshops.  This card is such a clever way to use our Cricut cartridge borders.  I believe most of them are cut at 3/4" and then just trimmed to fit across the card front.  I think I'm going to try this technique on a year-round card SOON!

I thought it might be a bit too late to make cards in my December clubs, but I knew my gals would be up for some tags!  I was inspired to make these tags by some posts I saw on Pinterest. . .the Santa tag is definitely a straight copy, but I'm not sure of the original source.  His face is just a 1 3/4" circle.  His beard is a 2" scalloped circle (cut on my Cricut), folded in half (you can open it up and put the message under his beard).  His hat is a 1 3/4 x 3 inch rectangle of red cardstock, cut diagonally, then folded down.  The trim on his hat is one of our scalloped borders cut with the Cricut Art Philosophy cartridge (1/2 inch size).  We have a moustache image on our Cricut Artiste Cartridge--that would have been fun to add to the Santa!!

The other tags are cut with our Art Philosophy and Artiste Cricut cartridges.  I used papers from our current Pear & Partridge card kit as well as the now-retired Elemental paper pack. 

Monday, December 3, 2012

Sharing a couple of great projects from my team Christmas party

I host a Christmas party for my Close to My Heart team every year, and the highlight of the party is our handmade gift exchange.  Each of the gals makes a handmade gift item and wraps it up.  We play the game where you can open a gift or steal someone else's gift, and we can get competitive with it.  But, in the end, it's all good, because we each go home with something fun and we ALL get to see some great project ideas--because we have such wonderfully talented Consultants on our team!   Here's a couple of my favorites from this year:

This framed button Christmas tree was made Rhonda Leeper.  It's such a fun way to use our beautiful buttons and sparkles!

This decorative wall hanging, made by Gwen Fillinger, was probably the most "stolen" item of the evening!!  I don't think that my photo really captures how beautiful this was.  Gwen started with square wooden bases that she painted.  Then, she layered cardstock and stamped papers, our Dimensional Elements Album Pages, and images she cut on the Cricut with the Artiste cartridge.  The result is stunning!  I think you can see the layering in the photo below.

Saturday, December 1, 2012

Origami Christmas Tree Tutorial

I recently made one of these origami tree cards, and it was SO much fun!!  And, it's not nearly as hard as it looks (yea)!  I thought I'd give you some step-by-step instructions so you could make one on your own.  For my card, I used paper from the Pear & Partridge paper packet.  I like a nice heavyweight patterned paper (but not cardstock) for the tree.
 
To start, I cut four squares from my green patterned paper:  1 1/2", 2", 2 1/2" and 3".  You can use larger squares, just make each one 1/2" bigger than the one before.
 
By the way, I HIGHLY recommend a bone folder tool for these projects--we carry a great one in our catalog (Z1204 for $4.95).  Your folds will be so much more crisp with this tool.  Anyway, begin by folding one of your squares in half diagonally (desired pattern on the outside).  Open it up and fold it again diagonally in the opposite direction.


At this point, your paper looks like the roof of a house.


Squeeze in two opposite sides of your roof and fold the roof down into a triangle.  Your piece will now be a triangle with two "layers."  You may need to use your bone folder or fingers to work it into a nice point on the top.

 
Set your triangle down and fold one of the layers on the front of your triangle down toward the middle.

 Fold the other side of front flap toward the middle as well--so that both folds meet at a straight line down the middle.  Fold all of your remaining squares the same way.
 Once your squares are folded, glue your SMALLEST piece to the top of your base card/project.  Then, tuck the next piece slightly inside of it and glue it down.  Continue on with the next bigger piece and then, finally, the largest piece. 

December Stamp of the Month--a year full of fun!

 
Your'e going to love our December Stamp of the Month because it has images for the whole year!  These would be great for quick cards (think 3 x 3) or wonderful on an Event Calendar or calendar scrapbook pages.   You can purchase the Stamp of the Month anytime during the Month of December--and it's only $5 with a $50 purchase (or you can purchase it at full retail for $17.95 with no additional purchase required)!   To order it, visit my website, http://christina.ctmh.com.  While you're there, be sure to check out our awesome "while supplies last" clearance items--and get some super deals!


Wednesday, November 28, 2012

A quick overview of my December Classes

Display Trays--make any of these three trays on December 10th, 6 p.m.  NOTE:  I need to know by December 1st so that I can order the trays and accessories.

 
To make this tray with the Clementine paper and variety of colors, cost is $28.


To make the tray shown above with the Avonlea paper and canvas stickers, cost is $32.

To make this Christmas Display Tray, cost is $34 (includes set of rub-ons and set of chipboard Dimensional Elements).


Come to one of my December hostess clubs and you can make this beautiful Christmas layout.  If you'd like to officially join our club rotations, both of my Monday clubs are taking new members.  Or, if you just really want to make this layout but can't commit to the club, you can attend and place a $20 minimum order when you come.   The first club meets Monday, December 10th, at 10 a.m.  Second club meets Monday, Dec. 17th, at 6:30 p.m.  If you are a card maker, I will have some winter cards or 3D projects designed for you. . .still working on it!

 
Come to the cookie/recipe exchange class and make these adorable "JOY" blocks (made with our My Creations Blocks--Z1746, $3.95 each) on Thursday, December 13th, 6 p.m.  Cost for the class is $15.   For this class, each participant makes a holiday treat (this can be cookies, candy, breads, hot cocoa/tea mix, snack mix, etc.) and brings a copy of her recipe along with her goodie.  Once I get a final head count, I can tell you how much of your treat to bring.  I then divide up the goodies and send everyone home with a sampler platter. . .plus, we might just do a little sampling while we're there!


Monday, November 12, 2012

Get a great deal and help a great cause!

Our November Stamp of the Month is a great basic set with months and numbers that you can use on layouts, cards, calendar projects, etc.   You can purchase this stamp set for only $5 with any $50 purchase this month.  And, when you take advantage of this Stamp of the Month deal, you'll ALSO receive your choice of any stamp set from the catalog for HALF PRICE!!  That's a great deal!  And, Close to My Heart will donate $1 to the Red Cross for every Stamp of the Month sold in November!  This month is flying by, so be sure to place your order by the end of the month.  You can order through my WEBSITE or contact me directly.  


Friday, November 9, 2012

Projects for my Great Gifty Ideas Workshop

Each fall, I offer a Greaty Gifty Ideas Workshop to show my customers some fun, inexpensive gift items that they can make.   These are some projects that I came up with:
You'll find this triangle box on the Cricut Artiste Cartridge (Z Key>3D Object).  I cut mine 11 inches (Fit to Page).  I used the Pear & Partridge paper and stamps from the Merry & Bright stamp set.  The poinsettia is also on the Artiste Cartridge (Merry Christmas key). 

Our new Treat Cups are fun and affordable (only $3.95 for a set of ten).  For this project, I cut the ornament shapes with the Cricut Artiste cartridge and then used the Center Point key on my Cricut to cut a 1 3/4" circle in the middle of the ornament so that I could fit my treat cup in.  The Treat Cups have a self-adhesive rim on the back, so I filled it with candy, pulled off the adhesive backing and attached it to the solid red ornament.  I cut another ornament 1/4" smaller, cut the circle out of the center of it and put it over the other ornament.

There's a cute little snowman jar in our catalog on p. 87, and I wanted to try making something similar.  The snowman comes fom the Flakey Friends stamp set (C1506, $13.95).  I stamped him in black Staz-On ink on white cardstock, colored him with our alcohol markers and cut him out.  Then, I painted a thin layer of Tacky Glue over the front of him and glue him to the inside of the jar.  Then, I sprayed spray adhesive on the inside of the jar and sprinkled it with Prisma Glitter.

For the lid, I stamped the "Love Never Melts" message (also from Flakey Friends) directly onto ribbon with the Staz-On ink pad.  I cut some snowflakes with my Artiste Cricut Cartridge and hung them on the bow with our grey Baker's Twine.

Wednesday, November 7, 2012

Cards from my Christmas Card Marathon

Each fall, I offer a Christmas Card Marathon where my customers can make 20 cards in one night.  I select five card designs and we make four of each design.  Here are the five cards I designed for this year's marathon:

This card features Pear & Partridge paper and the stamp set from the Pear & Partridge card workshop. 

I wanted to show off our fabulous Artiste Cricut Cartridge and show my customers that they can use paper from other non-Christmas paper packs (like Dakota) to make Christmas cards.  The mittens are cut using the Cricut Artiste Cartridge with Barn Red and Pacifica cardstock. 

I don't think my photography skills quite captured this one, because it has some nice sparkle with the Prisma Glitter and Sparkles on it.  I used Whisper and Slate cardstock.  The images are from the Blessings of Peace stamp set (B1406, $9.95).  I stamped them in Whisper Ink

As you can probably already tell, I lean toward simple, clean designs on my cards.  This one is made with the Merry & Bright stamp set (C1510, $13.95).  I put Liquid Glass on top of the "berries" to give it a more 3D look.

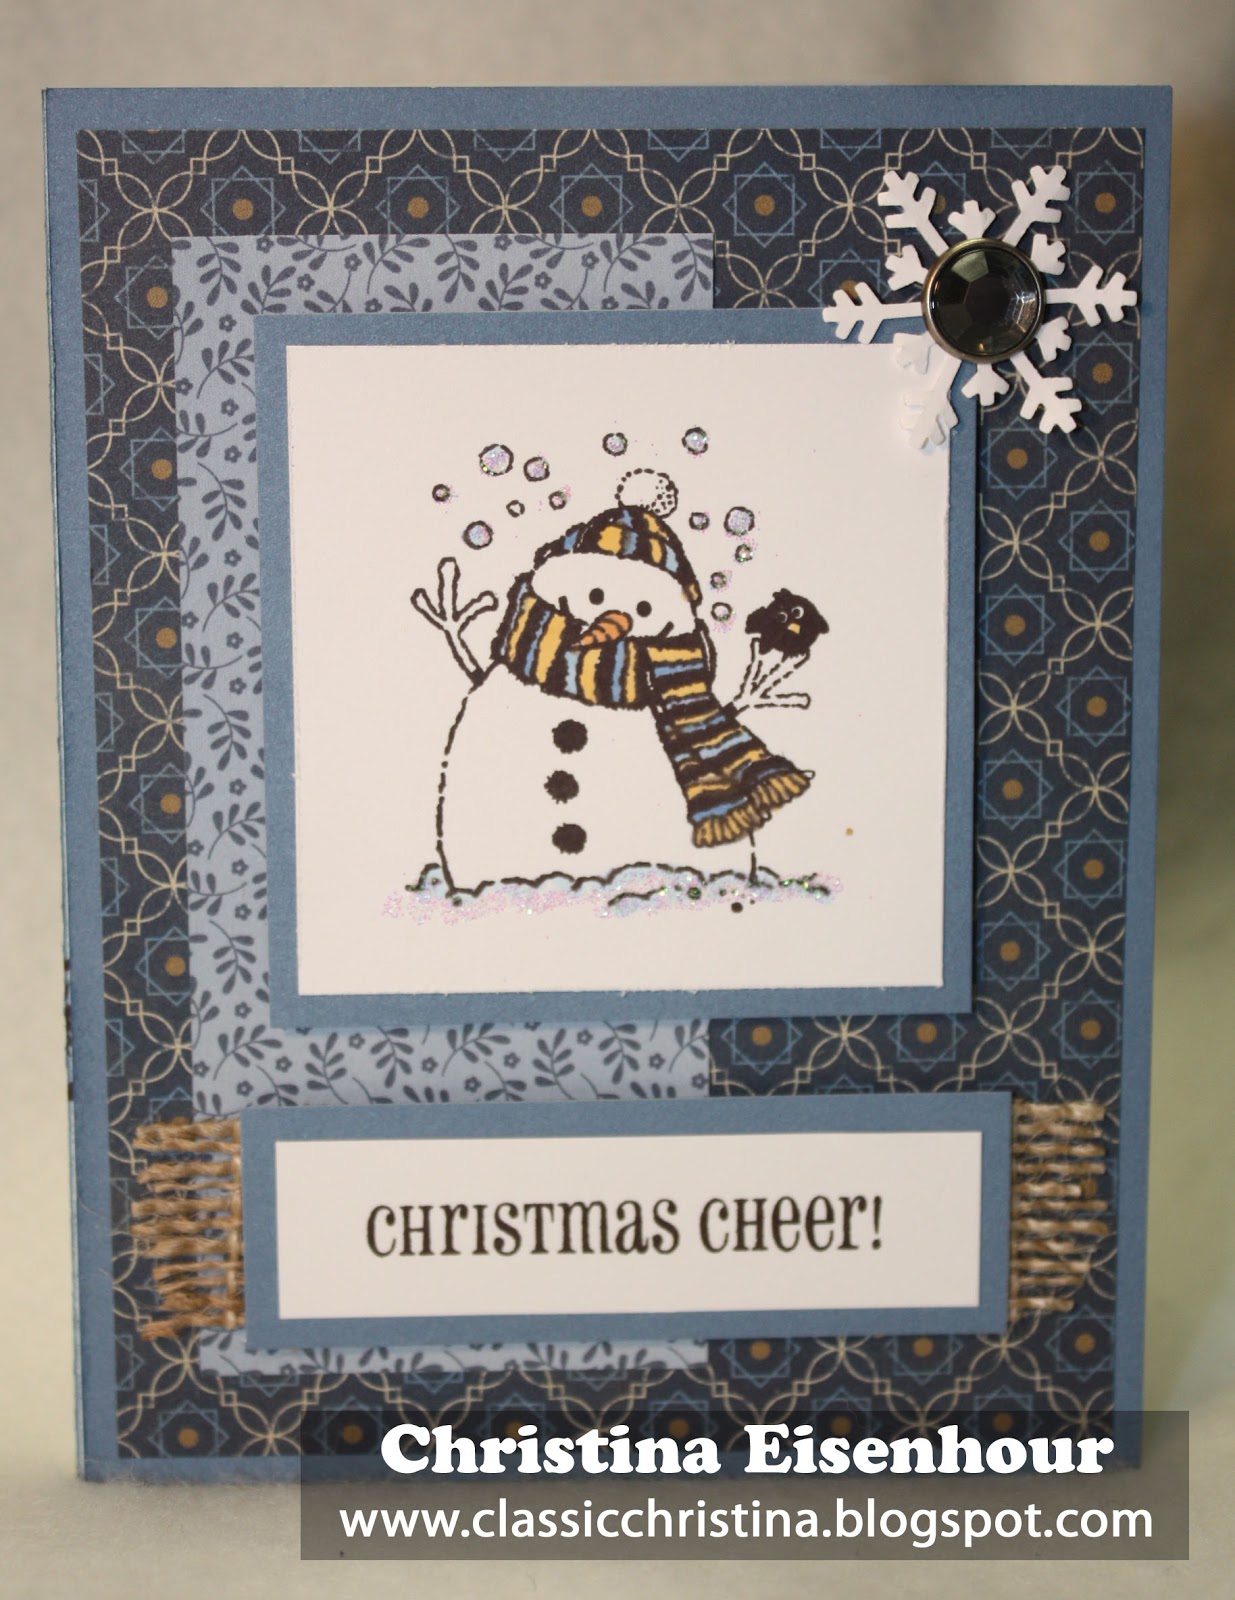
I am a SUCKER for snowman stamps!!  I love them all!  I'm particularly fond of this year's new snowman set, Flakey Friends (C1506, $13.95).  I stamped this snowman in Staz-On ink and colored his scarf with our new alcohol markers.  I used the Pemberley paper packet for this card, again showing that you don't have to use Christmas papers to make a cute Christmas card.  I used a bit of our Burlap Ribbon to embellish the message box--I frayed it out to make it look a bit like the ends of a scarf.
You can order the stamp sets, paper and accessories for any of these cards on my website, http://christina.ctmh.com


Monday, November 5, 2012

Advent Calendar Workshop on the Go

This workshop is coming up Thursday, November 29th, 6 p.m.  If you'd like to attend, be sure to sign up by November 16th.  Cost for the class (which includes the My Creations Cubby box, the cardstock, the chipboard "frames" and a number stamp set) is $52.  I believe this is a project that you can display again and again for years to come.  Also, the colors are subtle, so you could keep the cubby out all year.  Or, as one of my friends suggested, you can make a second set of boxes/drawers that you use throughout the year.

More Display Tray Fun!

I finally got a chance to sit down and make a Display Tray with some of Ellen's senior photos.  This is such a fun way to show off a variety of poses!  You can personalize the tray to go with your child's personality--or even use high school colors and memorabilia.  I think these trays would also be ADORABLE for baby photos!  You can purchase these ready-to-embellish Display Trays on my website, http://christina.ctmh.com (click on SHOP) for only $19.95.  I've decided to offer another Display Tray Class before Christmas because these trays make such a wonderful gift item.  If you'd like to attend, you can make this tray (tweak it to your tastes) or the Avonlea Display Tray that I posted last month.   Class is Monday, December 10th at 6 p.m.  Cost is $30-$35, depending on which tray you select.

Monday, October 29, 2012

Embellishing with the Cricut Cartridge

I'm really excited to share this project.  Consultant Joanne Walton shared a photo of a pumpkin she embellished with paper flowers, and I just knew I had to try it!!  Well, the craft store was all out of fake pumpkins this week, so I found this basket.  I cut all of the flowers using my Cricut Art Philosophy cartridge--flower sizes range from 1 1/2 to 3 inches--using Goldrush and Creme Brulee cardstock as well as some patterned paper from the Flirty paper packet.  I sponged the edges of the flowers with Goldrush ink.  The leaves are cut out of Olive cardstock using the AP cartridge.  You can buy all of these papers, the burlap ribbon, and the Art Philosophy Cricut cartridge on my website, http://christina.ctmh.com.  Did you know that, if you have a party order of $250 or more, you can purchase the Cricut Collections for HALF PRICE?!!!

Monday, October 22, 2012

Autumn Cards with Cricut Creativity!

I've had fun playing with my Cricut Artiste and Art Philosophy Cartridges and our pretty fall papers.  These cards may look a little tedious, but they're actually easy because the Cricut does all the work!  If you don't yet own these cartridges, you need to give them a try!  Each cartridge has about 700 images on it (that's about four times the number of images on a typical cartridge). . .and, once you start using them, you'll find that you'll rarely need another cartridge!  Plus, each cartridge comes with three coordinating stamp sets.  You can purchase either cartridge on my website,  http://christina.ctmh.com.
For this card, I used paper from both the Moonlight and Flirty paper packets.  I also used solid cardstock in Cocoa, Olive, Goldrush, Autumn Terracotta and Barn Red.  The branch and leaves were cut with the Art Philosophy Cricut Cartridge, and the owl was cut with the Artiste cartridge. 


I used the Flirty paper packet, along with New England Ivy, Cocoa and Barn Red cardstock, for this card.  The tree and leaves were cut with the Art Philosophy cartridge.  I used 3D foam tape to raise most of the leaves up, which gives the card a little more dimension.  This took a few minutes, but I love the look!


Thursday, October 18, 2012

Card Kits--great value and great fun!


Our card kits help you create beautiful cards anytime you want!  Each kit includes an exclusive stamp set that you'll use AGAIN and AGAIN, even after you've made the cards in the kit, paper, embellishments (ribbons and sparkles/gems), and complete step-by-step instructions for cutting your paper and assembling the cards.

If you purchase the Pear & Partridge card kit, I recommend using Cranberry, Olive and Cocoa stamp pads.  Many of my customers already have these very popular colors, but if you don't, you might want to order them along with your card kit.

The Avonlea kit uses Smokey Plum, Chocolate and Slate.  I found that I didn't always like the Smokey Plum with it, so feel free to substitute other coordinating colors, like Juniper.  Also, because these cards are versatile, year-round designs, you can always substitute a different sentiment stamp, like a "happy birthday."

You can order your card kits directly through my WEBSITE.

Monday, October 15, 2012

We're halfway through October--get your October Stamp of the Month before it's gone!

I finally got some time to sit down and play with my October Stamp of the Month, "Very Merry Christmas."  First of all, let me say that this is an EASY stamp set to work with--solid images, no coloring required--and you can cut coordinating images on the Artiste Cricut Cartridge.  But, if you don't happen to have the Artiste Cartridge yet (what are you waiting for??), you'll still get lots of use from this stamp set.   You can purchase the Stamp of the Month for only $17.95. . .or better yet, get it for only $5 with a $50 purchase.


To purchase your October Stamp of the Month (or the fabulous Cricut Artiste Cartridge), go shopping on my website at http://christina.ctmh.com.


All of these projects were made with paper from the Pear and Partridge paper packet. 

Yet another box pattern you'll find on the Cricut Artiste Cartridge!

Sometimes I forget that we have these wonderful pre-cut circle cards (with envelopes) in our catalog.  They're only $5.95 for a set of 12 cards and envelopes in White Daisy (Z1353) or Colonial White (Z1352).  They're so easy to work with and a fun departure from the regular rectangle card shapes.
 
These are two of the many great tag shapes you'll find on the Artiste Cartridge.  You can stamp these images on a rectangle--but they're so much cuter on these fun tag shapes!

To get the two-tone color on the mittens, I stamped them twice (once in New England Ivy Ink and once in Cranberry) and then cut the tops out of the green ones. 

Friday, October 12, 2012

We interrupt this cardmaking session for some Apple Anna Bread

I've been making Apple Anna Bread for almost 20 years.  I think I got the recipe from an old Pfaltzgraff calendar.  I used it for years, then lost the recipe card for a few years, and then found it again last year.  What I like about this quick bread is that it stays very moist because of the bananas and apples. 

Apple Anna Bread

1/2 cup plus 1 T margarine (I used butter)
1 1/2 cups sugar
2 large eggs, room temperature
2 cups all-purpose flour
1 tsp. baking powder
1 tsp. baking soda
1 tsp. ground cinnamon
1 tsp. salt
2 rip bananas, mashed
2 cups apples, finely chopped
1 tsp. vanilla

Preheat oven to 350 degrees.  Grease and flour a 9" loaf pan (I have found that this overflows my loaf pan a bit--last time I made it, I doubled the recipe and put it in THREE disposable aluminum loaf pans and it came out about right).  Cream margarine/butter and sugar until fluffy; add eggs.  Sift dry ingredients together and beat into creamed mixture.  Stir in bananas, apples and vanilla.  Pour into pan and bake 1 hour.  It's done when the center starts to firm up--it may take a bit longer or a bit less, depending on your pan.  I do find that the top gets fairly brown before the middle gets done.

I'm sure you could also add some chopped walnuts or pecans to this bread.


Moving on to Autumn Cards

I got this technique idea from Papercrafts magazine (a good magazine for card makers).  I don't think it shows up that well in my photo, but let me explain how I did it.  First of all, I stamped the three leaves on a separate piece of scrap cardstock and cut them out.  I put some Bonding Memories glue on the back of the leaves and let it air-dry so that it would be repositionable.  I positioned the leaves down on my background piece of Colonial White cardstock.  Then, I used our Close to My Heart spray pens, shown in the photo below (Z1380--three pens for only $3.95) to create the speckled look on the background.  I filled each pen about halfway with water and then added a few drops of reinker until I got the depth of color I wanted (I would suggest Saddle, Olive or New England and Goldrush--we carry reinkers in ALL of our 40 ink colors).  Then, I sprayed each color on the background.  I peeled off the leaf "masks" and let the paper air dry.  Once it was dry, I stamped the leaves with our pigment ink in the void that was left by the masks I had used earlier.  It's a fun technique, though it takes a few steps and a little drying time.  A quick tip from me:  when you're using techniques that get your paper damp/wet, use an iron to quickly dry the paper and make it nice and flat again.
 

This card was inspired by a layout that I saw on Vicki Wizniuk's blog, www.wizardshangout.blogspot.com.  I used the Flirty paper to create the column down the middle of the card.  The leaves and "Give Thanks" were cut with the new Cricut Artiste cartridge.  Even if you're not a scrapbooker, you can get inspiration from scrapbooking ideas and use these ideas on your cards and 3D projects. 

Wednesday, October 10, 2012

Yet Another Halloween Treat Box!

Okay. . .I think this is my last Halloween post, and then it's on to other fall projects.  This little gift bag is actually a copy of one that I saw in our beautiful Idea Book.   It uses Perfect Fit--Halloween stamp set (B1413, $9.95).  I made this a few weeks ago, and I've forgotten which box pattern I used from the Cricut Artiste Cartridge.  I THINK I used the shirt box (p. 75, Happy Father's Day>3D Object).  I cut the top off the box with a pair of jagged decorative scissors. . .which you could do with any upright treat box pattern.  I sponged the box lightly with Autumn Terracotta and Cocoa ink and cut the papers from the Moonlight Paper Packet. 

Friday, October 5, 2012

Layout for October's Open Club

This is the Clementine layout we'll be making for our October open club workshop.  If you'd like to attend our workshop and make this layout on Thursday, October 18th, let me know.  I got my design idea for this layout from Diane Meinhardt, and I believe she got her design idea from our Close to My Heart bulletin board--so, I'm not sure who to give original credit to for this one!  The cardstock colors are Sorbet, Twilight, Creme Brulee and Saddle.  The pennants are cut from the Cricut Art Philosophy cartridge and the buttons are cut from the Artiste Cricut Cartridge and stamped with the new Buttons, Bits and Bobs stamp set.  I love the paper patterns in the Clementine paper packet--when you put them all together, it reminds me of a country quilt!